What an API is and how to build one in Ruby on Rails
What an API is, how resources and end-points work, and how to build one with Rails 4 using TDD, versioned routes and JBuilder views.
First we'll look at what an API is and which concepts surround it, and then we'll build one in RoR 4 using TDD, along with a few gems that will make our work easier and faster.
Fair warning: my goal with this post isn't to write an exhaustive tutorial on exactly how an API should be built, but to give you an introduction to the world of API's ( ◠‿◠).
After working with Ruby on Rails for a short while, I ran into articles and tutorials about how easy it was to implement an API with RoR, which caught my attention and got me digging deeper. Funny enough, one week later I was asked to build one — and I have to say it was a rather pleasant experience, thanks to how easily you can build great things in RoR.
An API is an application programming interface. It's a set of routines that provides access to functions of a given piece of software.
As always, the definition sounds boring (ㆆ_ㆆ). An API lets different applications (web and mobile) talk to our own application. What do these external applications use to consume our services? A root or base URL that, combined with a series of 'end-points', parameters or queries, returns a set of plain data [I say plain because it comes in formats like XML or JSON, leaving HTML aside].
As an example, you'd have http://myapiname.com as the root URL, and as 'end-points' you could have:
- http://myapiname.com/users → returns the list of users
- http://myapiname.com/users/1 → returns one specific user
- http://myapiname.com/users/1/posts → returns every post belonging to a specific user
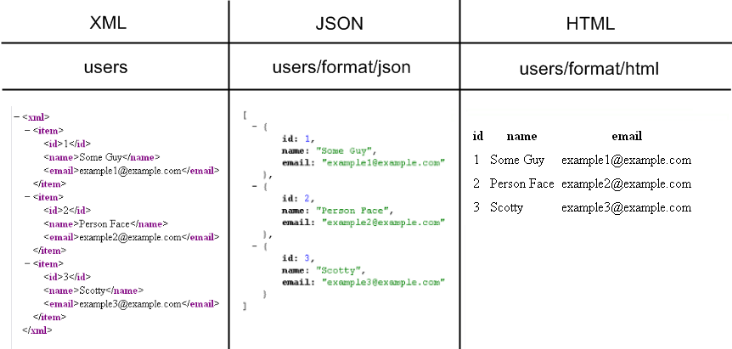
The image below is a perfect example of how the data would look when requesting http://myapiname.com/users [in REST API terms, 'users' would be called a 'resource' — nouns (not verbs!! 屮ಠ益ಠ屮) used to represent the data; Rails itself follows this convention]. XML and JSON are the most common formats when it comes to API's [I recommend JSON for its simple structure; being an object makes the data much easier to work with, and JSON is also faster than XML]. HTML is used purely to display data on web pages.
Bye bye front-ends ( ˘︹˘ )…

To build an API we won't need CSS or HTML, simply because they aren't necessary. Our API only exists so applications can consume our services, and all these 'applications' want is the data they care about. They don't need it dressed up with HTML or CSS because, after all, that part is on them.
One difference I noticed between a WEB app and an API: while the former is designed and built to be consumed and used by end users, an API is built to be used by developers and consumed by applications.
Now that we understand what an API is and how it works, let's see how to build one with RoR 4 [with the release of RoR 5 it was announced that it ships with a built-in command for creating API's]. The first thing we'll do is create a new project called my_api.
To keep things simple, my_api will have a single resource called users, which will return all users in JSON format.
We create our RoR app with:
$ rails new my_apiThen we go into the project folder and set up our routes.rb file:
# my_api/config/routes.rb

Rails.application.routes.draw do
  namespace :api, defaults: { format: "json" } do
    namespace :v1 do
      resources :users
    end
  end
end
With the above, our base or root URL ends up like this:

If you noticed, on line 5 I created another namespace [a namespace adds a slug '/api/' to our base route]; this one handles our API versioning. In this case it's 'v1' because, obviously, it's the first version of our API ლ(╹◡╹ლ). Ah! I almost forgot: at the end of line 4 we have format: "json", which tells Rails that, by default, everything returned by that route will be in JSON format.
The URL to access our users resource, defined on line 6, would be:
http://localhost:3000/api/v1/users
Now let's create our User model, which will have only two fields: name and email.
$ rails g model User name:string email:stringLet's add a few validations to our model to make sure users are created correctly. But first, let's use TDD!! (͡° ͜ʖ ͡°) — that is, write the tests first and the code afterwards [by the way, if you haven't read my post about TDD in RoR yet, you can do it here (͡• ͜ʖ ͡•)]. For this I'll use the famous rspec-rails gem, complemented by shoulda-matchers and factory_girl_rails.
# my_api/spec/models/user_spec.rb

require 'rails_helper'

RSpec.describe User, type: :model do
  it { should validate_presence_of(:email) }
  it { should validate_presence_of(:name) }
  it { should validate_uniqueness_of(:email) }
end
We have 3 tests: the first two validate that email and name are always present on our model, and the last one validates that the email is unique — that is, two users can't share the same email ლ(╹◡╹ლ).
Once the tests are written, we run them, and of course they'll fail because we don't have the validations in our model yet ლ(╹◡╹ლ).
Let's add the validations to our User model:
# my_api/app/models/user.rb

class User < ActiveRecord::Base

  validates :email, presence: true, uniqueness: true
  validates :name, presence: true

end
If we run the tests now, they should pass. Next up is our controller: inside the controllers folder we create a folder called 'api', inside it another one called 'v1' (for API versioning), and finally, inside that last folder, our controller users_controller.rb. BUT FIRST!! we write the tests (͡° ͜ʖ ͡°) — you know what they say: test first (͡° ͜ʖ ͡°).
These are the tests for our controller, which will have a single method returning all the data in JSON format. Inside our spec folder we create a folder called requests [the name reflects that we're testing our API's requests] and inside it our file user_spec.rb:
# my_api/spec/requests/users_spec.rb

require 'rails_helper'

RSpec.describe Api::V1::UsersController, type: :request do

  describe "GET /users" do
    before :each do
      FactoryGirl.create_list(:users, 1)
      get "/api/v1/users"
    end

    it { have_http_status(200) }
    it 'show all users' do
      json = JSON.parse(response.body)
      expect(json.length).to eq(User.count)
    end
  end

end
Despite appearances, the test above is very simple. We have a describe (line 7) that groups the GET request we'll use to fetch all users. After that comes a before, a block of code that runs before each test; here we create a user using FactoryGirl [in this case with create_list, which takes two parameters: the name of the model to create and the number of records to create]. Line 10 makes sure a GET request is sent to "http://localhost:3000/api/v1/users" before each test.
Our first test (line 13) verifies the request status is 200 (meaning everything went as expected, no errors), and the second one (line 14) verifies the request returned a JSON with the same number of objects as our User model holds.
Now let's add code to our controller:
# my_api/app/controllers/api/v1/users_controller.rb

class Api::V1::UsersController < ApplicationController

  def index
    @users = User.all
  end

end
Nothing out of this world: we have a @users variable holding every record in our User model.
And finally, our view:
# my_api/app/views/api/v1/users/index.json.jbuilder

json.array! @users do |user|
  json.(user, :id, :email, :name)
end
You'll notice the view lives inside /views/api/v1/users, mirroring the structure of our controller. The view's format is 'json.jbuilder', which lets us output data as JSON ლ(╹◡╹ლ). The syntax isn't complicated either: we iterate over every object in @users and specify which fields we want to expose.
Finally, if we add a couple of records to our User model and visit http://localhost:3000/api/v1/users, we get:
[
  {
    "id": 1,
    "email": "giancarlos.isasi@devacademy.la",
    "name": "giancarlos"
  },
  {
    "id": 2,
    "email": "nexuszgt@gmail.com",
    "name": "Nexus zgt"
  }
]
Finally… We did it!! (҂◡̀_◡́)ᕤ
Ruby on Rails lets us build fabulous things very quickly, with the least possible effort.
There's still a lot more to learn about API's, but I decided to skip it so this post doesn't get any longer than it already is. I hope this helped and serves, as I said at the beginning, as an introduction to the world of API's.
Thanks for reading! (ಥ_ಥ)
You can check out my other posts (҂◡̀_◡́)ᕤ
- How to secure your RESTful API
- Don't know how to test a Rails controller? This post is for you!
- How to test your Rails models with RSpec
By the way, here are the links to the gems used in this post, plus the official Ruby on Rails documentation on API's: